
|
|
 Most designers who went to school were taught that PVC was somehow bad and harmed the environment. Most of this is stemmed by either inferior plastics or by old information that is not up to par with how plastics are made today. According to the Tarnell Company Recycler survey, One Billion pounds of vinyl is recycled annually within North America, with over 150 million pounds of post-consumer materials, a 40% increase since 2014. In the U.S. most of the 10 billion pounds of vinyl resin produced annually goes into durable goods—approximately 5 billion pounds goes into water infrastructure (large pvc pipes) that is buried underground and has a service life in excess of 100 years—so it doesn’t go into the recycling stream. In addition, less than 3% of all plastics sent to US landfills is PVC Elimination of Lead and Cadmium: In the early 1980’s the U.S. and Canadian vinyl industry began a stewardship program aimed at implementing alternative stabilization technology to eliminated the need for stabilizers that contain metals, such as lead or cadmium. This effort was complete for cadmium around the year 2000 and for lead around the year 2006. Better Emissions: 28% decrease in dioxin emissions since 2009, which amounts to 3.3% of all government regulated sources . Chlor-vinyl industry dioxin ambient emissions amount to 3.3% of all 2015 regulated sources such as metals, cement, paper, power, wood, oil and chemicals. It should also be noted that most materials including carpet, drapes and even natural wood can release dioxin emissions when on fire. Chrlorine Production: US and Canadian raw material manufacturers for vinyl resin produce their own chlorine at or near their facilities resulting in minimizing risks associated with chemical transportation, leaks from loading and unloading operations and reducing the industry’s carbon foot print. The US vinyl chloride producers no longer rely on chlorine derived from mercury-cell technology to manufacture PVC resin. For more information on education of PVCs and vinyls we recommend you to visit https://www.vinylinfo.org/vinyl-sustainability-council/
1 Comment
 Recently we were deciding whether or not to add a new perfect touch solid color that matches Arauco to our line. A team mate asked "Well why don't we add 3 colors instead of just one to enhance our chances". Below was my response.
There are 5 criteria I'd add to deciding on a new color. 1. Board matching. When we match boards it is tapping into an existing market created by having the edgebanding, board and thermofoil all in coordination. We look at the distribution strength of that board company as well as the quality of the match. 2. Cross pollination. For a solid color there may be already matches in the market , however, if there are other matches it won't necessarily hurt our sales. In reality the more people out pushing a color the more likely demand for that color will rise. In addition, some door makers may prefer to deal with Dackor and some may prefer to deal with a competitor. 3. Cash flow. If we invested into 3 colors it may be better to do one right. The reason is that we can fully commit to that color and unlike many competitors, we are less likely to discontinue an item. In addition we are not spreading out the investment across more colors to see what sticks but instead on good matches when we can that are in demand, especially for board matching stock colors. 4. Operations. When we add a new color it involves warehouse management, samples, marketing , sales management and other operational people. Lots of people get tapped whenever we add a new color . 5. Sales. The more colors we have the more our efforts are spread over those items so it can become a distraction to push an item that does not have the overall marketing legs.  This email is about the Dackor culture, how we came into existence and what I believe is the right attitude.
Before I created Dackor, I worked in various jobs and went above and beyond with websites, brochures, came in early, left late, worked on the weekends, helped co-workers, studied at night, read books to sharpen my knowledge and generally just went all out. My employers benefitted from having a hard working employee that went above and beyond and I benefited because I learned valuable skills that built both myself AND contributed to success. As my success grew, so too did my confidence. What I learned was to add value for the sake of adding value and striving to improve rather than simply demanding instant payment in a transactional mentality. I did not become resentful that other employees did not contribute the same level of effort because I know that in order to stand out you have to be willing to go above and beyond. When you go above and beyond it stands to reason that not everyone else will. But "Your attitude will determine YOUR latitude." When we opened Dackor in the US in 2003, I wanted to create an environment where people could grow, a place that attracts people with good attitudes but also a place where we reward exceptional results. Not everyone on our team will go above and beyond however, I believe that Dackor rewards people who create exception results. Whether it is rewarded by overtime, salary increase or commission, we are looking to create an environment where the cream rises to the top, but not an environment of tit for tat where every action is rewarded as if the company does not pay a base salary. Sometimes it takes time to see results. When you are on a mission for growth there are times you will head down the wrong path. Working extra hard may not always generate exceptional results that will immediately lead to rewards. What I have learned is that hard work instead gives me the opportunity to figure out where to invest my time. Through trial and error you will learn what the best use of your time is and how to create phenomenal results with the best leverage of your time. It takes time to figure this out and in some case years. Most seemingly overnight successes are never done overnight. I hope as I share the above you know it comes from a place of personal experience but also it can be a new attitude for some. Since you are an adult, can you say you've always done your best? Have you always given 110% to your work? I will tell you that it's never too late to start. Below are examples of having the right attitude versus the wrong attitude. LOSING COMMENTS 1. That's not my job 2. Am I going to be paid extra for that 3. That's not fair that I am doing all the work 4. Why aren't others contributing the same as I am WINNING COMMENTS 1. That is my job, if it helps grow the business or helps my co-workers 2. I am going to contribute with the best use of my time because I know it will pay off eventually in increased sales and/or recognition. 3. I am the best person to do it because I go the extra mile. I'm not going to gear down to match someone else's attitude. 4. I realize that not everyone will go above and beyond but I do because that's a winning attitude ! SUMMARY: The above is not being written for any one specific person, it's written FOR YOU. Part of a winning attitude is to take personal responsibility for yourself. And as I always say "We don't have control of others....we only have control of ourself and our actions." Sincerely, Mark Viers  This article will discuss the process which Peelstix is sold to multi family apartments .
MULTIFAMILY: As we know, when apartments and cabinets are installed they use new cabinetry. The cabinets can be made local or off shore and then imported. Within new construction of cabinetry our product may be used for the doors however for the cabinets its more common that paper or melamine board be used for the cabinet sides. The reason is due to cost and secondly Peelstix main benefit is that it is used to refurbish cabinet boxes, hotel doors, etc. Peelstix saves money when remodeling however in new cabinet construction typically is not cost beneficial in multi-family. In multi-family, the owners typically hire a design firm although some developers do design in house. Dackor raw 3D and 2D films may be specified in new construction however it then goes out to bid by a cabinet company to win the job. In this case the Kitchen cabinet company may contact Dackor to find a door maker if this Kitchen manufacturer does not have a membrane or vacuum press in house. MULTI FAMILY REMODELING: When apartments wish to remodel, the property manager may seek out approval from corporate to do new cabinetry. In this case the firm could use a designer however often the property manager will decide to get bids from cabinet companies to rip out and install new cabinets, countertops, etc. With Peelstix, the idea is to educate the property manager on the benefits of refacing instead of having a traditional kitchen company bid out the remodel. The benefits are: - Less down time as a kitchen can be done in one day for an apartment - Less dust and debris since not tearing out the existing boxes - No smell or harmful VOCs that can be incurred by painting. - Less cost since the existing boxes can be reused, possibly the countertop can be kept in place - Less cost due to less dumpster fees, no electrician needed, no plumber needed and no drywall repair or tile repair needed that would normally be associated with a complete tear out PAINTING CABINETS: We mentioned above that cabinets may be replaced but that it takes more time, has more dust but also costs more. One other option is to paint the cabinets. Painting has different levels of quality however the biggest complaint in painting is that its often a temporary solution. Painting the doors that are handled by the tenants can sometimes not hold up. In a residential a more quality paint job could be done however usually this level of painting is not cost effective for multi family. It should be noted that some companies when wanting to do white may opt to spray the boxes white and then simply buy new doors that will more hold up to the rigors of having tenants. Some challenges may be: - Having to deal with both a painter AND a company to hang the new doors - The smell created by painting as well as the time to set up to tape off the area CONCLUSION The main purpose of Peelstix films, accent planks and Natura Stone are to resurface existing surfaces. The nature of Peelstix is that it adds value by going over existing surfaces. Refacing is a cost effective solution that has the quickest turn around and causes less disruption for the tenants. 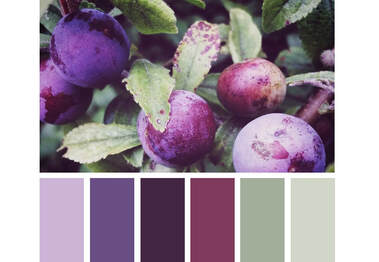 by Matt Arriola
Does it drive you crazy when you go to order a thermofoil color from a vendor only to find out it has been discontinued and now requires a large custom order? Often these custom orders can be 3,000 or even 5,000 meters. Although we cannot guarantee to not discontinue an item, Dackor is the leading company on maintaining stock. But aside from our 250 plus stock items that we maintain for our clients, Dackor has a great custom program to enable you to switch more and more colors over to our company. You can go to www.Dackor.com/colors and look for a very close or close match first or contact your Account Managers at 407-654-5013 to do the searching for you. In addition you can visit https://www.dackor.com/custom and input your image right on our site. What if you need to color match? STEP 1: INQUIRE > Fill out this form and we will let you know within 2 business days or less if we are capable of your required match quality. Please note that if we have the tooling our MOQ is 600 linear yards for melamine matches (in distribution) or leathers or 1200 yards for all others. Please allow 2 business days for us to evaluate target. STEP 2: MATCH? Within 2 business days we will confirm match capabilities. You can then issue a PO for $500 color match deposit which is fully credited upon order. Matches take 4 to 6 weeks and you will receive a lab sample. STEP 3: EVALUATE ! After you receive the match and approve simply issue a PO for the agreed quantity and await 10 to 12 weeks for the material to be available , FOB, Orlando. This can be expedited 4 to 6 weeks by air for an additional fee. We will typically produce 2,000 to 3,000 yards at our discretion for back up inventory. After the initial PO and MOQ you may order from remaining stock as needed. Color match request form Inquire> | Match? | Evaluate! Examples of Recently discontinued 3D Laminate colors in the marketplace. Ebony Ash, Light Maple, Black Haircell, Antique Whitewash, Russian Maple, Soprano, Sugarloaf Maple, Matte Black, Matte Malachite, Matte White, Oxidized Pewter, Platino Granite Sand, Platino Granite Tanin, Pompeii Marble Espresso, Pompeii Marble Gray, Rift Oak Brown, Rift Oak Gray, Carbon Fibers Silver, Fibers Concrete, Cashmere, Fusion Maple, Imperial Smoke, Rift Oak Natural, Slate Gray, Smokehouse Oak, Stratus White, Tin Ceiling and Venus Silver. When refacing your residential kitchen there are various options when utilizing Dackor materials. The first question is if you are looking to change the layout drastically. In most cases where you want to significantly replace the layout of the Kitchen you will go with new cabinetry. If, however, you are OK with the layout refacing can save you thousands. Once you have decided to reface there are various other decisions to make. Some decisions are:
-Should I replace the countertop? -What style doors do I want? Slab, Shaker or Raised Panel -Do I want soft close hinges on the doors? We recommend as its a small expense If you are replacing your countertop, generally you want the countertops to be replaced before refacing so damage will be done do the doors or boxes. The most popular options for countertops are quartz and natural granite however some may also choose laminate countertops. Once you have your countertops installed and the color chosen it is more easy to choose colors for the doors. How does cabinet refacing work using Dackor materials? Dackor recommends a professional refacer who has experience working with Dackor Peelstix for the cabinet boxes and someone who has lots of experience hanging the doors. How does the refacer do the job? The refacer will measure your doors to the nearest 1/8" and take notice of the type hardware they need to get, any unique aspects of the job such as the box condition and any unique installation challenges. After they take the measurements they usually get a deposit so that they can custom order the doors to match your specific Kitchen. Typically it can take 2 to 3 weeks to receive the doors in however sometimes it may be faster. When the installer comes to install the job, it typically takes them 2 to 3 day. They take off the old doors, clean and prepare the box to be refaced using Dackor Peelstix. They then install the new doors and you get a completely transformed Kitchen saving thousands and with the color of your choice. The benefits of refacing in most cases are: -Saves money on a dumpster -No need for an electrician or plumber -No need for tear out and therefore no drywall damage or tile damage -Brand new doors and completely refaced box on the external of the cabinets -Quick install with no dust or debris -Ability to use your kitchen in the evenings even during the install process Imagine having a brand new looking Kitchen, not throwing away perfectly good boxes and not having to deal with numerous trades all of which cost more and create more complications. Although many jobs can have complications, you can rest easy knowing that you are using a quality product that will create more value in your home and put a smile on your face when you see the final results! This article is to explain more about the different thicknesses we produce and for what application they are good for.
THICKNESS REFERENCE: 0.15mm = 6 mil , semi rigid 0.2mm = 8 mil, this thickness and above are rigid 0.25mm= 10 mil 0.3mm= 12 mil 0.4mm= 16 mil 0.45mm=18 mil 0.5mm= 20 mil 0.7mm=28mil MEMBRANE PRESSING / VACUUM PRESSING: For Solids and Woodgrains, Dackor's 12 mil is most common as it can be membrane pressed by all however some company's even have the expertise to profile wrap as well. When you press, it uses heat and suction to form over the mdf components. This means that the material is pressed into the substrate. By going thicker you are able to hide more imperfections. In addition, by going thicker, deeper embosses can be incorporated for more realistic surfaces. Quality producers know that Dackor has a plethora of thicker materials as well and we do this to enable our customers to have higher quality parts and also to create more realistic woodgrain textures. PROFILE WRAPPING: When profile wrapping, companies do not experience suction of the material into the mdf so thinner products can be used. The most common sizes are 6 mil and 8 mil. When we produce 6mil we do so with a semi rigid vinyl. This reduces cost but also enables the product to wrap well. Some companies love semi rigid due to its ease of wrapping however semi rigids often are not as strong or durable to scratches and wear. For that reason we offer rigid 8 mil product to enable the material to be thin enough to wrap yet more durable to scratch and more rigid to process. SEMI RIGID VERSUS RIGID: The best way to describe the difference is that semi rigid feels more like a thin shower curtain that is more flimsy in your hand. This is caused by adding more plasticizers to enable the product to stretch. This also lowers the cost of the product. Rigid, however, uses a very low amount of plasticizers and enables the product to be more rigid. The product still goes on a roll however its really more like a thinner version of membrane press laminate. FLAT LAMINATION: Companies can flat laminate 12 mil and thicker vinyls however this is typically done with a PUR line or 2 part epoxy. For most flat lamination lines you would utilize a 6 mil or 8 mil. This is personal preference. It should be noted the strengths and weaknesses are that the 6 mil applies more quick and cost less however being thinner it may show more imperfections in the substrate whereas the 8 mil is more rigid. Please note that the heat utilized in processing will be different as well based upon the formulation of rigid versus semi rigid as well as the thickness. If the product is more thick it may take more heat to absorb into the material. MITER FOLDING: When folding the vinyl becomes a hinge. This means that you are routering a v groove in the back of the part and only kissing the vinyl. When you fold the part you get a crisp edge. One advantage of a rigid vinyl is that when you fold it thermosets better and is less likely to pucker on the edge. So there are some strengths to miter folding a rigid over a semi rigid. CONCLUSION: Please note that there are so many variables in lamination. There is time, heat, duration, pressure, glue used, board, humidity , user and more. This means that like all professional laminations you really need to test produce product to be sure of the thickness and formulation to be sure more ease of processing. Although material can weight +/- 10% the below is a rough estimate on how much 3D Laminate weighs per linear meter versus linear yard by thickness when 1420 to 1450mm wide. It is calculate in pounds per linear meter LM or linear yard LY.
A couple years ago we told you about how Dackor manufactures a product called Peelstix.
Peelstix is a flexible laminate that can be trimmed with knives and can be fabricated in a shop or on site with no dust or smells. By having the adhesive already on the product it can also save time. White is a very popular color and these are just a few of what we offer that are doing very well: Solid Frosty White 12, Smooth Satin White, Solid Designer White, Solid Bright White, Saffron Mahogany, Leather Brown, Summer Breeze, Egg Shell Black Claw, Ravenwood, Solid Cashmere Black, Wilsonart Fusion Maple and Carbon Fibers. Well Peelstix has really taken off and is a favorite of Multifamily Housing, Refacers, Universities, Hospitals and More. So, what has been getting refaced you might ask? Multifamily Housing has really embraced Peelstix to update Kitchen Cabinets and Cabinet Doors along with the face frames to give the new apartment resident that updated look. Moreover, the bathroom vanities have gotten facelifts too! Our Accent Planks and Natura Stone are a favorite of Multifamily Housing as well. Account Planks, also a peel and stick product ideal for wall decoration. These planks decorate Accent Walls for an upscale look. Our Hand Painted Frosty White maintains a traditional woodgrain look with a beautiful Matte White Finish. The Rome Marble White, which could compete with the Greek marbles needs to be physically seen and not just from a computer monitor. Not to mention it is one of our Rhino Hz extra durable grades available. Natura Stone, the natural stack stone veneer is also a peel and stick. Yes, it’s real stone cut to a 1/16" to 1/8" thickness variance to give a stacked stone look. It comes in 4 beautiful colors of Copper, Sapphire, Emerald and Sesame. With minimal prep it will sophisticate any space by adding dimension and texture. This stone is great for accent walls, backsplashes, or any interior vertical application. Colors above also know as other industry names you may have heard are: Ebony Ash, Light Maple, Black Haircell, Antique Whitewash, Russian Maple, Soprano, Sugarloaf Maple, Matte Black, Matte Malachite, Matte White, Oxidized Pewter, Platino Granite Sand, Platino Granite Tanin, Pompeii Marble Espresso, Pompeii Marble Gray, Rift Oak Brown, Rift Oak Gray, Carbon Fibers Silver, Fibers Concrete, Cashmere, Fusion Maple, Imperial Smoke, Rift Oak Natural, Slate Gray, Smokehouse Oak, Stratus White, Tin Ceiling and Venus Silver. Many cabinet door and component producers have asked where they may recycle PVC. As long as your product does not have glue you can visit: scrappvc.com
Officers Richard Silberfeld, President Ray Brown, VP Sales Corp. Office Address 97 Sawtooth Cove Port Jefferson, NY 11777 Warehouse Address 1510 5th Industrial Court Bay Shore, NY 11706 Telephone Office: 631-969-1050 Fax: 631-969-1051 Alt. Office: 516-356-5120 Alt. Fax: 631-331-1885 Web Address www.universalcomposites.com www.scrappvc.com E-mail Address [email protected] Ideal for thermofoil / membrane press vinyls. |
Design Life blogColor inspiration from around the world, backstories on design inspiration and informative articles about marketing, membrane pressing and personal development. Author Mark Viers delivers fresh content that will help you and your business grow and thrive. Categories
All
Popular articles Language of Color Breaking membranes? Delamination Tearing on corners Solving wrinkles Solving dog ears Video installing peelstix 3DL for high end kitchens Pompeii design inspiration Archives
May 2024
|
 RSS Feed